Whether you’re setting up a new business email or reconnecting an existing mailbox, Microsoft Outlook makes it easy to manage your emails in one place. This guide walks you through configuring your email account using secure SSL settings, ensuring your messages are sent and received safely.
Before You Begin
Before starting the setup process, make sure you have the following information ready:
- Your full email address (for example,
yourname@yourdomain.com) - Your email account password
- Incoming and outgoing mail server details
- Internet connection
If you’re unsure about your email server information, contact your hosting provider or system administrator before continuing.
Step 1: Open Microsoft Outlook
Launch Microsoft Outlook on your computer.
If this is the first time opening Outlook, the setup wizard will appear automatically.
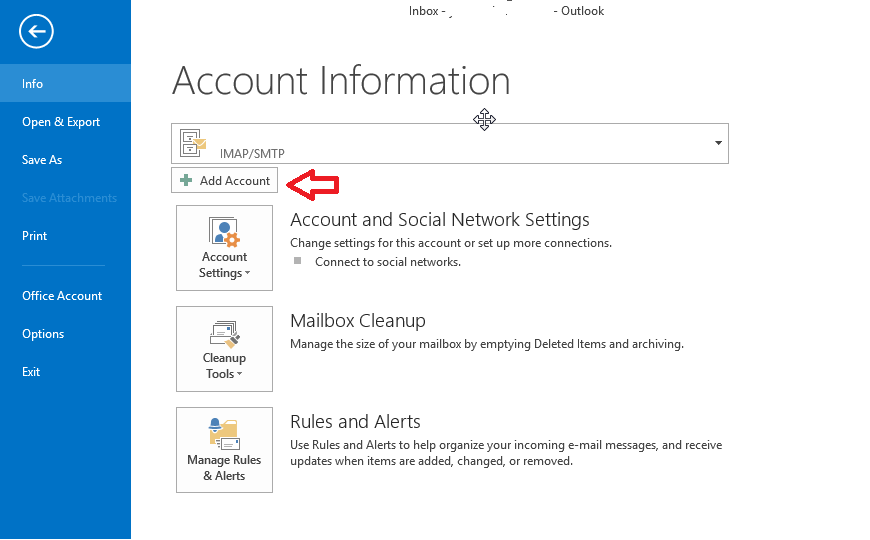
If Outlook is already configured with another account:
- Click File in the top-left corner.
- Select Add Account.
- Continue to the next step.
Step 2: Enter Your Email Address
Type your complete email address.
Example: john@company.com
Click Connect.
Outlook will first attempt to configure the account automatically.
If automatic setup doesn’t complete successfully, choose Advanced Options and select Let me set up my account manually.
Step 3: Choose Your Account Type
Outlook allows several email protocols.
IMAP (Recommended)
IMAP keeps your emails synchronized across all devices. Any changes you make—such as reading, deleting, or moving messages—will also appear on your phone, tablet, and other computers.
Choose IMAP if you regularly access your email from multiple devices.
POP3
POP3 downloads emails directly to your computer and may remove them from the server, depending on your settings.
This option is generally suitable only if you use one device to manage your email.
For most users in 2026, IMAP is the preferred choice.
Step 4: Enter the Mail Server Settings
Fill in the incoming and outgoing mail server information provided by your hosting provider.
Typical examples include:
Incoming Mail Server : mail.yourdomain.com
Outgoing Mail Server : mail.yourdomain.com
Replace yourdomain.com with your actual domain name.
Step 5: Configure Secure SSL Settings
For the best security, Outlook should use encrypted connections.
IMAP Settings
| Setting | Value |
|---|---|
| Incoming Protocol | IMAP |
| Incoming Port | 993 |
| Encryption | SSL/TLS |
| Outgoing SMTP Port | 465 |
| SMTP Encryption | SSL/TLS |
POP3 Settings
| Setting | Value |
|---|---|
| Incoming Protocol | POP3 |
| Incoming Port | 995 |
| Encryption | SSL/TLS |
| Outgoing SMTP Port | 465 |
| SMTP Encryption | SSL/TLS |
Using SSL helps protect your login credentials and email data while they’re being transmitted over the internet.
Step 6: Enable SMTP Authentication
Before Outlook can send emails, make sure SMTP authentication is enabled.
Open More Settings, then:
- Select the Outgoing Server tab.
- Enable My outgoing server (SMTP) requires authentication.
- Choose Use same settings as my incoming mail server.
This allows Outlook to authenticate your account before sending emails.
Step 7: Complete the Setup
Click Next.
Outlook will verify:
- Incoming server connection
- Outgoing server connection
- Account authentication
If everything is configured correctly, Outlook will display a confirmation message.
Click Finish to complete the setup.
Test Your Email
After setup is complete, it’s a good idea to verify everything is working.
Try sending a test email to yourself or another email address.
Then confirm that:
- The email is sent successfully.
- Replies are received correctly.
- Outlook synchronizes your folders.
Common Setup Issues
Outlook Keeps Asking for Your Password
Double-check:
- Caps Lock is turned off
- Your email password
- Username (use your full email address)
Unable to Connect to the Incoming Mail Server
Possible causes include:
- Incorrect server address
- Wrong port number
- SSL not enabled
- Firewall or antivirus software blocking the connection
Verify all settings with your email hosting provider.
Emails Can Be Received but Not Sent
This usually means:
- SMTP authentication isn’t enabled.
- The SMTP port is incorrect.
- SSL encryption isn’t configured properly.
Review your outgoing server settings and try again.
SSL Certificate Warning
If Outlook displays a certificate warning:
- Ensure you’re using the correct mail server hostname.
- Confirm the SSL certificate is valid.
- Contact your hosting provider if the warning continues.
Avoid ignoring certificate warnings unless you’ve verified the server is trusted.
IMAP vs POP3: Which Should You Choose?
| Feature | IMAP | POP3 |
|---|---|---|
| Sync across multiple devices | ✓ | ✗ |
| Stores email on the server | ✓ | Limited |
| Best for phones and laptops | ✓ | ✗ |
| Offline access | ✓ | ✓ |
For most users and businesses, IMAP is the recommended option because it keeps your mailbox synchronized across all your devices.
Frequently Asked Questions
Can Outlook configure my email automatically?
Yes. Outlook will first try automatic configuration. If it can’t detect your server settings, you can switch to manual setup.
Which ports should I use?
For secure SSL connections:
- IMAP: 993
- POP3: 995
- SMTP: 465
Should I choose IMAP or POP3?
IMAP is recommended because it keeps your emails synchronized across multiple devices. POP3 is generally better suited for single-device use.
Why can’t I send emails?
The most common reasons include incorrect SMTP settings, disabled authentication, or an incorrect password. Verify your account settings and try again.
Final Thoughts
Setting up your email account in Microsoft Outlook is usually a straightforward process once you have the correct server information. By using secure SSL settings and enabling SMTP authentication, you can ensure your email communications remain protected while Outlook keeps your inbox synchronized across your devices.
If you continue to experience issues after following this guide, reach out to your email hosting provider for assistance. They can confirm your mail server details and help troubleshoot any account-specific problems.